1. Introduction
Ferrari Tip 53 Engine through Technical Drawing and Blog: Ferrari is synonymous with automotive excellence, blending performance with artistic design. Among its many engineering masterpieces, the Ferrari Tipo 53 engine stands out as a symbol of innovation and performance. This article delves into the technical drawings of the Tipo 53 engine, uncovering the engineering marvels that made it a cornerstone of Ferrari’s legacy.
2. Historical Context
The Ferrari Tipo 53 engine was introduced during a pivotal era for Ferrari, marking its dominance in both motorsport and luxury vehicles. Designed in the mid-20th century, the Tipo 53 played a vital role in Ferrari’s quest to outperform competitors on the track. This engine powered some of Ferrari’s most iconic models, cementing its place in the annals of automotive history.
3. Design Philosophy
The Tipo 53 engine embodies Ferrari’s relentless pursuit of perfection. Its design reflects a philosophy centered on achieving optimal performance while maintaining reliability under extreme conditions. The technical drawings reveal the meticulous attention to detail Ferrari engineers invested in this masterpiece, balancing power, efficiency, and durability.
4. Key Features of the Tipo 53 Engine
The Tipo 53 engine is celebrated for its advanced engineering. Key specifications include:
- Type: A high-performance engine configuration (e.g., V12 or flat-12), indicative of Ferrari’s preference for balanced power delivery.
- Displacement and Output: Designed to maximize power within stringent weight and size constraints.
- Valve Train and Combustion Technology: Cutting-edge systems that enhanced efficiency and performance.
Unique technical elements captured in the drawings include precision-engineered pistons, lightweight materials, and advanced cooling systems, all contributing to the engine’s legendary status.
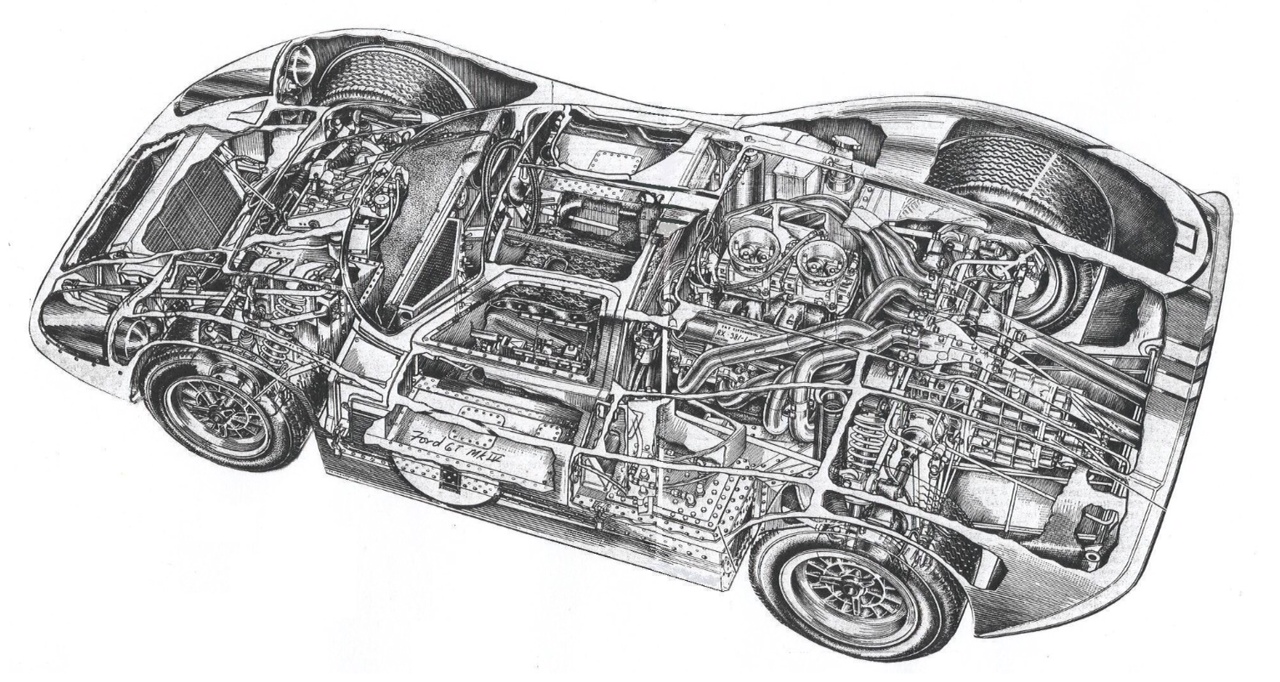
5. Breakdown of Technical Drawings
The technical drawings of the Tipo 53 engine provide invaluable insights into Ferrari’s engineering process.
Aesthetic and Functional Significance
These drawings serve not only as blueprints but as artistic representations of mechanical ingenuity. Every line and curve reflects a commitment to both form and function.
Major Components Highlighted
- Cylinder Heads and Pistons: Designed for optimal combustion efficiency.
- Crankshaft Design: Ensured smooth power delivery and durability.
- Intake and Exhaust Systems: Maximized airflow for enhanced performance.
- Cooling and Lubrication Systems: Engineered to maintain performance under intense conditions.
Insights from the Drawings
The drawings highlight Ferrari’s ability to innovate while addressing practical challenges, such as weight reduction and thermal management.
6. Influence on Ferrari’s Future Engines
The Tipo 53 engine laid the foundation for future Ferrari powertrains. Many of the design principles observed in its technical drawings influenced the development of subsequent Ferrari engines, ensuring they remained at the forefront of performance engineering. Its legacy is evident in Ferrari’s continued dominance in both motorsport and luxury automotive markets.
7. Cultural and Historical Significance
Beyond its technical prowess, the Tipo 53 engine holds a special place in Ferrari’s storied history. It symbolizes a golden era of innovation, where engineering excellence drove Ferrari to unprecedented heights in motorsport. Its contributions to the brand’s legacy are celebrated by enthusiasts and historians alike.
8. Conclusion
The Ferrari Tipo 53 engine is more than just a piece of machinery; it is a testament to the genius of Ferrari’s engineering team. Through its technical drawings, we gain a deeper appreciation of the artistry and precision that define Ferrari’s approach to automotive innovation. As a cornerstone of Ferrari’s heritage, the Tipo 53 engine continues to inspire awe and admiration, underscoring the importance of preserving and studying such historical engineering marvels.
Technical Drawing Tips
General Best Practices
- Understand the Purpose
- Know the function of the component or system you’re drawing. This ensures your design is clear and meets its intended purpose.
- Use Appropriate Tools
- Use CAD software (e.g., AutoCAD, SolidWorks) for precision and efficiency. For hand-drawn sketches, use proper drafting tools like rulers, compasses, and templates.
- Follow Standards
- Adhere to established drawing standards (e.g., ISO, ANSI, or DIN) for dimensions, symbols, and layout consistency.
- Maintain Consistency
- Use uniform line weights, text sizes, and drawing styles across all views to enhance readability.
Tips for Accuracy
- Start with a Rough Sketch
- Outline the basic shapes and proportions before finalizing the details. This helps identify potential issues early.
- Use Layers in CAD Software
- Separate components, dimensions, and annotations into layers to make editing and understanding easier.
- Double-Check Dimensions
- Ensure dimensions are accurate and realistic. Always cross-reference with specifications or measurements.
- Apply Scale Correctly
- Use an appropriate scale to represent the object realistically while fitting it on the sheet.
Tips for Clarity
- Include Multiple Views
- Use orthographic projections (top, front, side views) and, if needed, sectional views to fully describe the object.
- Label Everything
- Clearly label parts, materials, tolerances, and any special instructions. Use standardized symbols for clarity.
- Avoid Overcrowding
- Keep dimensions and annotations outside the drawing space whenever possible. Avoid clutter by spreading information logically.
- Highlight Key Features
- Use bold lines or shading to emphasize critical areas, such as holes, cutouts, or unique shapes.
Annotation and Dimensions
- Use Standard Dimensioning Practices
- Indicate dimensions with clear, precise leaders and arrows. Use proper units (e.g., millimeters or inches).
- Add Tolerances
- Specify tolerances where precision is critical to ensure manufacturing accuracy.
- Call Out Materials and Finishes
- Specify materials (e.g., steel, aluminum) and surface finishes (e.g., polished, painted) for manufacturing.
Technical Enhancements
- Use Exploded Views
- For assemblies, use exploded diagrams to show how parts fit together.
- Add Isometric or 3D Views
- Supplement traditional 2D views with isometric or perspective views for better understanding.
- Include Cross-Sections
- Use sectional views to show internal details of complex parts.
- Leverage Color and Shading
- Use colors or shading in CAD drawings to differentiate parts, materials, or functional areas.
Quality Checks
- Review for Errors
- Conduct a peer review to catch mistakes or ambiguities before finalizing.
- Verify Against Specifications
- Ensure the drawing aligns with technical and functional requirements.
- Keep Documentation Updated
- If changes are made, revise the drawing and document the updates with proper version control.
Communication
- Include a title block with key information:
- Drawing Title: Name of the part or assembly.
- Scale: Ratio used in the drawing.
- Date: When the drawing was created or revised.
- Drafter Details: Name of the creator and approvers.
By applying these tips, you can create precise, clear, and professional technical drawings that effectively communicate your design intent. Would you like advice tailored to a specific type of technical drawing?